



It’s summer, the pace has slowed down, and I want to write something different than usual. No frameworks, no twelve-component wheels this time. Just a manual. A simple one.
Every week now, someone sends me a screenshot. A tweet, a LinkedIn post, a news segment, always some version of the same story: a person with zero coding background opened a laptop and, a few hours later, had a working app. And every week, the message that comes with it is the same too: “Is this real? Could I actually do this? Or is this still a developer thing dressed up in nicer marketing?”
It’s real. And you can do it. But I want to be precise about what “this” actually is, because there are two very different things wearing the same clothes right now, and mixing them up is the reason a lot of curious people try once, get confused, and quietly give up.
So this is a manual, point by point, for someone who has never opened a terminal in their life. We are not going to build anything complicated. We are going to get you from an empty folder on your desktop to a real, running piece of software, using the actual tools developers use, not a simplified toy version of them. By the end of today, you should have something live on your own screen that you built.
If a term trips you up along the way, that’s expected. I’ll clarify as we go, the same way I’ve been learning and teaching this for the last two years.
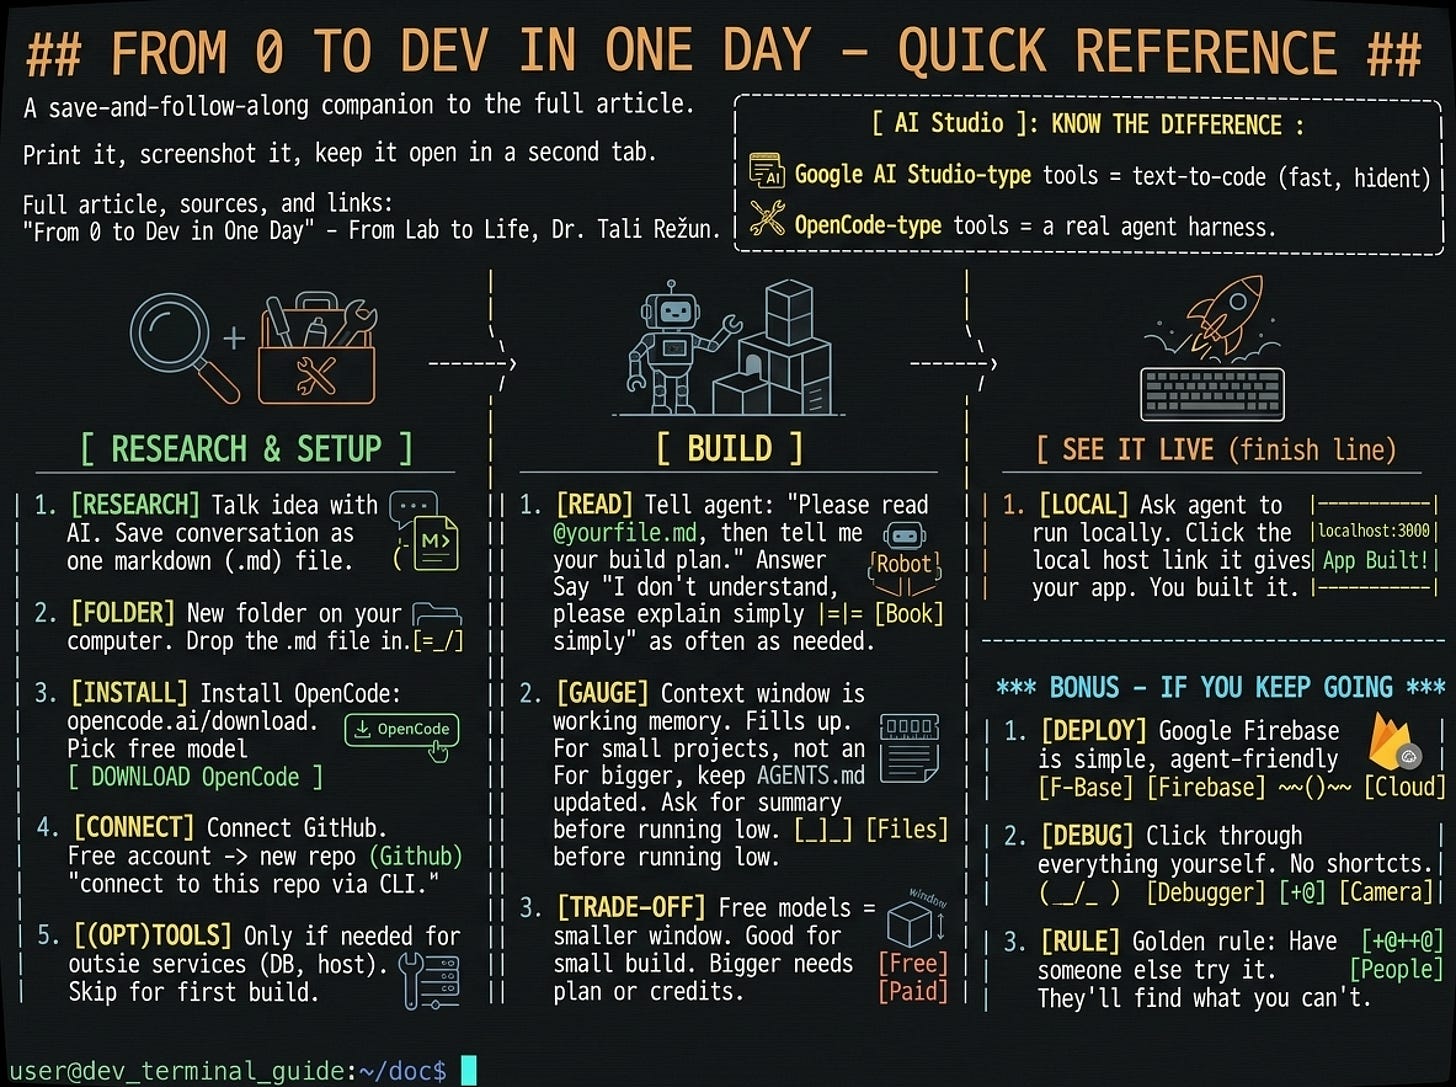
Tools like Google AI Studio’s “build” mode let you type a sentence and get a working app back. They’re genuinely impressive, and they’re a great front door. But they are text-to-code tools. They abstract almost everything away from you, on purpose. You never see the machine. You never touch the actual process a developer goes through. It’s the difference between ordering a finished meal and standing in the kitchen.
What we’re doing today is the kitchen. We’re going to use a real agent harness, the same category of tool that developers and “vibe coders” actually use to ship production software. In this article, we’re using OpenCode, and I want to tell you why before we go any further:
It’s genuinely open source, no company owns your workflow.
It comes with free coding models built in, so you can start today without a subscription or a credit card.
Its interface is simple and welcoming for a first-timer.
Everything you learn here transfers directly. The blueprint is the same whether you later move to Claude Code, Codex, or Augment Code. The harness changes; the underlying method doesn’t.
Clarification: an “agent harness” is the framework wrapped around an AI model that lets it actually do things: read your files, write code, run commands, talk to GitHub. The model (Claude, GPT, DeepSeek, whichever) is the brain. The harness is the hands, the memory, and the rules the brain operates inside of. Text-to-code tools hide the harness from you completely. Today, we’re going to actually use one.
I’ve written about this at length elsewhere (link at the bottom if you want the deep version), but here’s the short version so today makes sense: every real build goes through three stages. Research — you figure out what you’re building and write it down. Build — your agent reads what you wrote and builds it. Deploy & Debug — you test it, fix it, and put it on the internet. Today we’ll walk through all three, lightly, so you finish with something real. Stage three is optional territory if you want to stop at “it works on my computer,” and that’s a completely legitimate place to stop for your first day.
Open whatever chat AI you already use. Gemini, ChatGPT, Claude, it genuinely doesn’t matter for this first step. Describe your idea out loud or in writing: what it does, who it’s for, what it should look and feel like. Then ask it to turn that conversation into a single markdown file for you.
Clarification: a markdown file is just a plain text file (ending in .md) with some light formatting, headers, bullet points. It’s the native language both humans and AI agents read comfortably. You don’t need any special software to create or open one, a text editor is enough.
For something simple, a small website or a basic app, one page is plenty. If your idea is bigger, you’ll want more: an architecture document, a feature list, a page describing how a user moves through the app. Same process, just deeper. For today, keep it to one page. Copy what your chat AI gives you and save it as a .md file.
Create a new folder somewhere on your computer, named after your project. Paste your markdown file inside it. That’s it. This folder is now the home of your project, and everything, code, documentation, everything, will live here.
Go to opencode.ai/download and install OpenCode. When it asks you to choose a model, pick one of the free ones on offer. I’ve been building with DeepSeek V4 Flash Free lately, and it’s been genuinely capable for this kind of exercise, though which free model is best will keep shifting as these tools evolve, so check what’s currently on offer when you get there.
Once it’s installed, point it at the folder you made in Step 2. This becomes your working directory, the only place this particular agent should be looking at and writing to.
This one sounds more intimidating than it is. If you don’t already have a GitHub account, make one, it’s free, and open a new repository named after your project. Private or public is entirely your call.
Clarification: GitHub is where your code lives online, safely, with a full history of every change. Think of it as the permanent, backed-up version of your project folder. A repository (or “repo”) is simply the project’s dedicated space on GitHub.
Now, inside OpenCode, just tell your agent in plain language: “I have a GitHub repository at [your link]. Please connect to it via CLI so you can push my code there.” It will walk you through authorizing access.
Clarification: CLI stands for command line interface, the text-based way of giving instructions to software, instead of clicking buttons. You won’t need to learn it yourself, your agent operates it for you. You just need to approve what it asks permission for.
You only do this setup once. Every project after this, you simply tell your agent which repository belongs to it.
You can skip this entirely for your first build. But if you later want your agent to talk to outside services, a database like Supabase, a hosting provider like DigitalOcean, you do that by adding an MCP.
Clarification: MCP stands for Model Context Protocol. Think of it as a plug-in system. It gives your agent new abilities it didn’t have out of the box, the ability to reach outside your folder and talk to another service directly. If you need one, just ask your AI how to install it for the specific service you’re using. It’s a short, simple process.
That closes Stage One. You’ve done your research, and you’ve set up the harness with the tools and the foundational file it needs. If you’ve built before, this is the part you skip next time; your harness stays installed and ready.
Now the fun part. Tell your agent, in plain language, something like:
“Please read @[your-file-name].md first, then tell me your plan for building this.”
Clarification: the @ symbol is how you point your agent directly at a specific file so it knows exactly what to read before doing anything else.
Your agent will ask you questions. Answer them as best you can. And here’s the single most useful sentence I’ve used across two years of doing this, so use it liberally: “Sorry, I don’t understand this, I’m not a developer, please explain it simply.” No serious agent will judge you for asking. I learned almost everything I know this way, one clarifying question at a time.
Here’s the one concept in this whole manual worth slowing down for: the context window.
Clarification: an LLM (large language model, the “brain” behind your agent) can only hold a certain amount of information in its working memory at once. That limit is the context window. Once it fills up, the agent’s quality starts to slip, it forgets earlier instructions, repeats itself, or loses the thread of what it’s doing (i.e. context rot).
Frontier models today (Opus, Fable, the newest GPT and Kimi and DeepSeek models) sit around a million tokens of context, which for a small or medium project is generous. You genuinely won’t need to think about this today. Start, build, finish, all in one sitting, one conversation.
The moment this becomes real is if you keep building past today, across multiple sessions. Then your documentation stops being a nice-to-have and becomes your agent’s actual memory. This is why I keep saying: maintain your documentation. Most harnesses use a standing file for this, an AGENTS.md in OpenCode, a CLAUDE.md if you’re on Claude Code, that loads automatically every session and tells your agent who it’s working for and what’s already been decided. If you’re doing something more involved, ask your agent to keep a memory.md or a live spec file updated as it goes, and when you sense you’re getting close to that fuel gauge running low, ask for a handoff: a short summary of where things stand that you paste into your next session so nothing gets lost.
This is genuinely more advanced territory than a one-day exercise needs. I mention it because it’s the difference between people who build one small thing and stop, and people who keep building for years without their agents ever losing the thread. If you want to go further down this road eventually, I built The Curator specifically to solve this, an open-source second brain that gives your agent a persistent context memory layer across every project and every session. It’s linked at the bottom if you’re curious, but it’s a “someday” tool, not a “today” one.
Free models come with a smaller context window than the frontier ones. For the size of project we’re talking about today, a simple website, a small app, this will not be a problem. Don’t overreach on day one; keep the scope small and it will fit comfortably.
If you catch the bug and want to build something bigger down the line, OpenCode has genuinely affordable paid plans, or you can add credits to OpenRouter and unlock essentially any model that exists. That’s a decision for a later day, not today. Or better yet, ask your chat AI to help you think it through once you know what you actually want to build.
Once your agent has built something, ask it to run it locally. It will hand you back a link, usually something like localhost:3000, that you open in your own browser. That link is your finish line for today. Click it. Whatever you see there, you built it, point by point, from an empty folder this morning.
This is genuinely the right place to stop for a first day. Don’t chase deployment and debugging and polish on day one. Chase the feeling of clicking a link and seeing something you made.
Everything past here is extra credit, for whenever you’re ready.
Deploying means putting your project somewhere on the actual internet, not just your own computer. For simple projects, I point people at Google Firebase; it’s well suited to agent-driven deployment, and your agent can walk you through the steps directly. Where you deploy is also a decision you can fold into your Step 1 documentation, so your agent knows the destination from day one.
Debugging is the part nobody loves, me included. There’s no shortcut here: go through every button, every screen, every feature yourself, as a real user would. When something breaks, don’t just say “it’s broken.” Take a screenshot and describe exactly what happened, what you clicked, what you expected, what you got instead. Specific reports get specific fixes. I’ve experimented with letting agents test themselves automatically, and it works, but it’s slow and genuinely expensive in tokens, especially on anything visual. For now, your own eyes are still the fastest debugging tool you own.
And one golden rule that never changes regardless of how advanced you get: get someone who didn’t build the thing to go use it and tell you honestly what happened. They will find things you never would.
That’s a full day’s work, and a real one. Not a demo, not a simplified version, the actual method, just scoped down to something you can finish before dinner. If you build something today, I’d genuinely love to see it.
Režun, T. (2026). Context Is the Code: The Complete Three-Phase Process for Building with AI Agents. From Lab to Life. talirezun.substack.com/p/context-is-the-code-the-complete
Režun, T. (2026). Blueprint of a Frontier Coding Agent. From Lab to Life. talirezun.substack.com/p/blueprint-of-a-frontier-coding-agent
Režun, T. (2026). The Agent Memory Problem, and Why It Matters. From Lab to Life. talirezun.substack.com/p/the-agent-memory-problem-and-why
OpenCode (open source). opencode.ai
The Curator (open source, author’s own project). github.com/talirezun/the-curator
Dr. Tali Režun is a Serial Entrepreneur, Business Developer, and Academic at the forefront of frontier technologies. As Vice Dean of Frontier Technologies at COTRUGLI Business School, he leads AI innovation initiatives and shapes MBA curricula for the next generation of technology leaders. With over 30 years of entrepreneurial experience, founding and scaling ventures including The Curator, Lumina AI, Moj AI, Block Labs, 4thTech, Immu3, and PollinationX, he bridges cutting-edge research in AI and Web3 with practical business transformation.
Research and Educational Purpose. This article is published for research and educational purposes only. It reflects the author’s personal experience building software with AI coding agents over the past two years.
No Commercial Relationships. The author has not been compensated, sponsored, or otherwise financially supported by OpenCode, Google, Anthropic, DeepSeek, or any other tool or platform mentioned in this article. The Curator, where referenced, is disclosed plainly as the author’s own open-source project.
Evolving Landscape. Free model offerings, pricing, and available tools change quickly in this space. Details in this article, including which free model is currently recommended, were accurate at the time of writing and should be re-checked against current documentation before you begin.
Originally published on Substack and Medium; a summary is on talirezun.com.
By Dr. Tali Režun · From Lab to Life · Essay · 20 July 2026